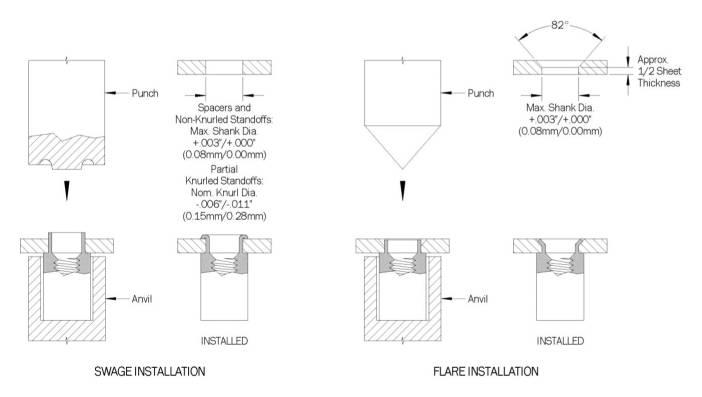
Swage spacers and standoffs are inexpensive and reliable solutions for precisely spacing stacked and/or mating sheets, panels and chasses. Knurled swage standoffs resist spinning from applied torque and improve grounding connections. Spacers and standoffs may also be flared-in for a flush installation. Follow these instructions for correct swage or flare installations.
Swage Installation
- Prepare the sheet as shown for swage installation.
- Insert the spacer or standoff into recessed anvil and place sheet hole over spacer or standoff shank.
- Squeeze the spacer or standoff between parallel and concentric anvil and punch. Swage the shank using light pressure. For partial knurled standoffs, press the knurls into the sheet until the body shoulder contacts the sheet before swaging.
- Anvils and punches should be made from hardened steel or may be ordered from PENCOM using the part numbers shown on the spacers and standoffs product pages.
Flare Installation
- Prepare the sheet as shown for flare installation. For flush flaring into a countersunk hole, use shank length that is .020” (0.51mm) less than the sheet thickness.
- Insert the spacer or standoff into recessed anvil and place sheet hole over spacer or standoff.
- Squeeze the spacer or standoff between parallel and concentric anvil and punch. Flare the shank into the sheet countersink using light pressure.
- Punch flare angle should match the sheet hole countersink angle. Anvils and punches should be made from hardened steel or may be ordered from PENCOM using the part numbers shown on the spacers and standoffs product pages.
- Standoffs with knurled shanks are not suitable for flare installation.
Note: During installation some cracking may occur around the perimeter of the spacer or standoff shank and is considered normal.

